LinkedIn is a powerful social networking platform that has over 722 million users worldwide. It is a great platform for professionals, businesses, and job seekers to connect, network, and grow their careers. One way to enhance your LinkedIn presence is by regularly posting content that is relevant, informative, and engaging.

However, posting content manually every day can be time-consuming and may not always be feasible, especially if you have a busy schedule. Fortunately, LinkedIn provides a free scheduling tool that can help you manage your posts efficiently. In this article, we will discuss how to schedule posts on LinkedIn for free.
Also Read: 13 Most Liked Tweets Ever – An Updated List
How to schedule posts on LinkedIn for free?
Here are 5 steps to schedule posts on LinkedIn for free.
Step 1: Create a LinkedIn Page or Profile
The first step to scheduling posts on LinkedIn is to have a LinkedIn profile or page. If you don’t have a LinkedIn account, create one by visiting LinkedIn’s website and following the sign-up process. If you already have a personal LinkedIn account, you can create a LinkedIn page for your business or organization. Once you have created your profile or page, you can start posting content.
Step 2: Navigate to the LinkedIn Page
To schedule posts on LinkedIn, you need to access the LinkedIn Page you want to post to. Go to the LinkedIn homepage, click on the “Work” icon at the top right corner, and select “Create a Company Page” if you want to create a page. Alternatively, if you already have a LinkedIn page, go to the page by clicking on the “My Pages” tab on the left side of the screen.
Step 3: Create a Post
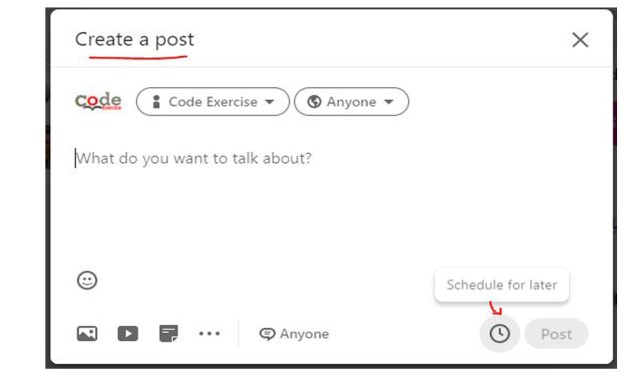
The next step is to create a post. Click on the “Create a Post” box on the page, and a new window will appear. In the window, you can type or paste the text you want to post. You can also add images, videos, and documents by clicking on the relevant icons below the text box.
Step 4: Schedule a Post
After creating your post, you can schedule it to be published at a later date and time. To do this, click on the drop-down arrow next to the “Post” button and select “Schedule post.” A new window will appear, and you can select the date and time you want the post to be published. LinkedIn allows you to schedule posts up to six months in advance.
Step 5: Preview and Publish
Before scheduling your post, you can preview it to see how it will look on LinkedIn. Click on the “Preview” button to see how your post will appear. If you are satisfied with the post, click on the “Schedule” button to schedule the post. Your post will be published automatically at the scheduled time.
Also Read: How to Appear Offline on Facebook Using a PC, iOS or Android
Conclusion
Scheduling posts on LinkedIn is an excellent way to save time and stay active on the platform. By following the steps outlined above, you can easily schedule posts on LinkedIn for free. Remember to create high-quality content that is relevant and engaging to your audience. Regularly posting valuable content can help you increase your reach, grow your network, and achieve your professional goals on LinkedIn.